Tuesday, February 26, 2013

Making an Identification

The flexibility of BowerBird is that anyone who has Joined a Project can add an identification to any Observation posted to that Project.

Let's go through this with a demonstration:

I have entered a new Observation but not provided an Identification:  See the arrow points to 0 identifications.


Another user named Heather believes she know what this species is and so Clicks the Blue Identify button (see above) which opens a new template where she clicks the "Identify the Sighting" button. (see below)


This opens up the Identification template.  Here you need to find the name you want to use for this animal or plant.  There are a number of ways to do this:

1.  You can choose to find a name by typing in either its scientific or common name; or,
2.  You can choose to expand the Classification hierarchy to find your scientific only name.


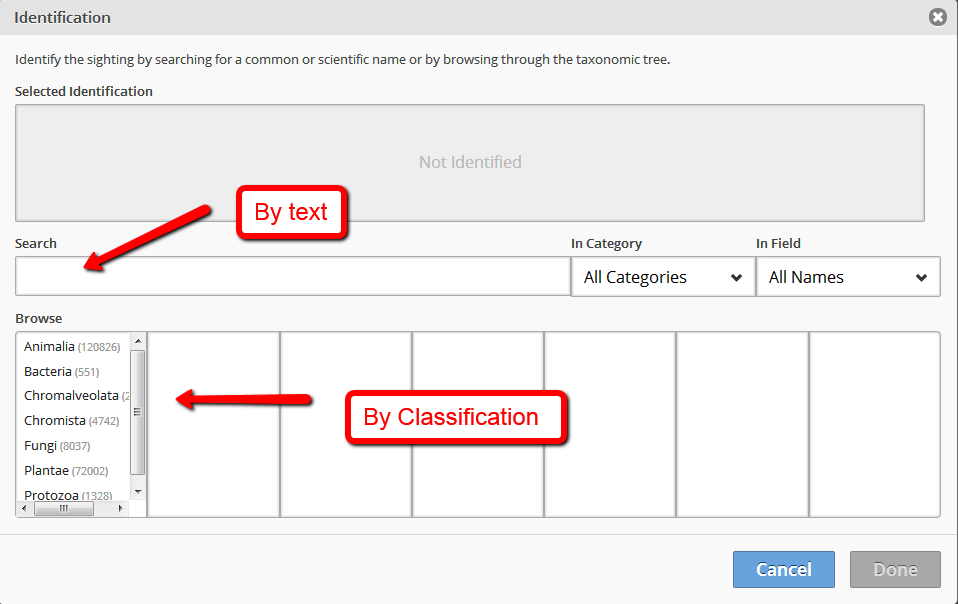
Let's try the text search for COMMON name. It's common name begins with "Blue eyes".  There is only one animal in Australia with that Common name.  You click the offered name to accept it.


Let's try searching for the scientific name which has the generic name "Nymphes".  You can see that all species in the genus Nymphes are returned and you just need to click the name you want.


Let's try the Classification search.  Here we have gone down from Animalia to the correct species name.


Having accepted the identification (click DONE and SAVE), a new item pops up in the Timeline showing my original upload and Heather's identification of my image:


Now, my original Observation has had its Identification counter updated to reflect that an identification has been done.


That's identification in a nutshell.  

Cheers -- Ken
Image Types and Suggested Image size for BowerBird use.

BowerBird will accept a wide variety of image types:  JPEG, PNG, BMP, GIF and TIF.

We suggest you primarily upload JPEG or PNG images.

We also suggest these file size setting for images to be uploaded to BowerBird:

1000 pixel width at 72 DPI:


Bye Ken

Monday, February 25, 2013

Getting Started!

Hi All,

Here is how to JOIN, LOGIN, SELECT OR CREATE A PROJECT AND CREATE A NEW OBSERVATION.

Step 1.  Register on BowerBird.


Through this template:


Then Login:


Once inside BowerBird -- you can enhance your Profile by Editing it.  Click the button in the top right corner and Edit Account Details.


You can add an avatar, give some details about yourself and even select what time zone you are in.


Now what to do?

Once logged in, you are presented with your own personal BowerBird space.  Because it is your own BowerBird space, you must tell BowerBird what you want to see and do  in BowerBird.  The "seeing" and "doing" are done through Projects.

The first thing to do in BowerBird is to click the Projects button at the top.


This will show you a display of all of the Projects that have been created on BowerBird.  

You can choose to Join as many of these Projects as you like. 

You simply click the "Join" button in the bottom right corner of the Project box.  

If ever you want to leave a Project, simply go back to the Project Box and re-click "Joined" which will change to "Join" and you will removed from the Project.


You can also choose to Create a New Project.

Simply click the Project create button in the top left corner.


This will open a template for you to complete. You can add a Project avatar and Project Background images. Provide a name, what animal or plants groups will feature in the Project and provide a brief description of your new Project then click Save.  

Other will hopefully see your Project and decide to Join and to contribute.


Creating a new Observation.

Click the "Add a new sighting" button in the Top left corner.


This will open a template.

Step 1.  ADD MEDIA (Images, Sound files or Video links to YouTube or Vimeo)


You can add up to 20 images per Observation.


Step 2.  ADD A TITLE

Step 3. ADD A LOCATION AND GPS COORDINATES

You can TYPE IN A LOCATION NAME (eg. Benalla).  Google Maps will offer you a known locality and you select or reject it.


If selected, a blue pin will drop onto the map.

If you want to adjust where the pin is placed, You can change the View of the Map to Satellite and you can EXPAND the map.


Here is an example of where I have moved the pin from the middle of Benalla into the NE.


You can also supply the GPS coordinates yourself.  Just click the "Edit Coordinates" button:


You will be offered 3 ways to enter GPS coordinates:

1.  Decimal Degrees


2. Degrees Minutes and Seconds


3.  UTMs


Step 4.  ADD A CATEGORY:

These are a selection of the animals or plants or fungi to choose from:


Step 5.  ADD A DATE


Step 6. ADD A PROJECT.

You will only see a selected of the Projects that you have either Joined or Created


Step 7.  CLICK SAVE


That's how to add an Observation.

In other Blogs I will show you how to edit an Observation, Identify it, Vote for it, Add Descriptions, Comments and Tags.

Cheers -- Ken